Get started with SvelteKit and Xata
In this guide, you'll learn how to add Xata database and search functionality to a SvelteKit application. You'll build the following basic blog application features:
- List all blog posts
- Retrieve and view a single blog post
- Full-text fuzzy search of blog posts
Although this application is a simple blog, you can apply these basics to other types of SvelteKit applications.
The completed SvelteKit and Xata code for this
guide is available via the Xata examples repo on GitHub.
Install the Xata CLI:
npm install -g @xata.io/clinpm install -g '@xata.io/cli'Once installed, authenticate the Xata CLI with your Xata account. If you don't already have an account, you can use the same workflow to sign up for a new account. Run the following command to begin the authentication workflow:
xata auth loginOn completion, the command will create a new API key for your user account, which you should see in the account settings page within the Xata UI. That key will also be stored locally on your computer (the location might vary for each OS). It looks like this:
# .config/xata/credentials
[default]
apiKey=YOUR_API_KEY_HEREBegin by creating a new SvelteKit application, accepting the default prompt options:
npm init @svelte-add/kit@latest xata-sveltekit -- --with typescript+tailwindcssOnce the command has completed, go to the xata-sveltekit directory and run the application:
cd xata-sveltekit
npm run dev
By default, the application will run on http://localhost:5173/.
Once you have the Xata CLI installed, are logged in, and have set up a new SvelteKit application, you are ready to use the Xata CLI to generate a new database. Accept all the prompt defaults for the following command except for the region selection, where you should choose the region closest to your application users:
xata initOn completion, the CLI will create .env, .xatarc, and src/xata.ts files within your project folder with the
correct credentials to access your database.
Your .env file should look something like this:
XATA_API_KEY=YOUR_API_KEY_HERE
XATA_BRANCH=main
Vite is used as the development server, and it will only load environment variables prefixed with VITE_. So, update
the environmental variables:
VITE_XATA_API_KEY=YOUR_API_KEY_HERE
VITE_XATA_BRANCH=main
For more information on Vite's handling of environment variables and the need for the VITE_ prefix, read the Vite
environment variable docs.
Since you selected TypeScript support after running xata init, it also created files that provide typings and functions to call using Xata's
TypeScript SDK. This will additionally be referenced in the .xatarc file as follows:
{
  "databaseUrl": "https://my-xata-app-database-url",
  "codegen": {
    "output": "src/xata.ts"
  }
}
The src/xata.ts file includes generated code you should typically never touch manually.
You can use the Xata UI to manually define your schema and add data. However, for this guide, you'll use the Xata CLI and a CSV file to:
- Auto-generate a schema based on column headings for names and data types inferred from the column values
- Import data to the database
First, download the example blog posts CSV file. You can either do this manually or by running the following command:
curl --create-dirs -o seed/blog-posts.csv https://raw.githubusercontent.com/xataio/examples/main/seed/blog-posts.csvcurl.exe --create-dirs -o seed/blog-posts.csv https://raw.githubusercontent.com/xataio/examples/main/seed/blog-posts.csvNext, import the CSV:
xata import csv seed/blog-posts.csv --table Posts --createNow, if you open up the Xata UI and navigate to your database, you will see the Posts table. Alternatively,
you can run the command xata browse to open a browser window:
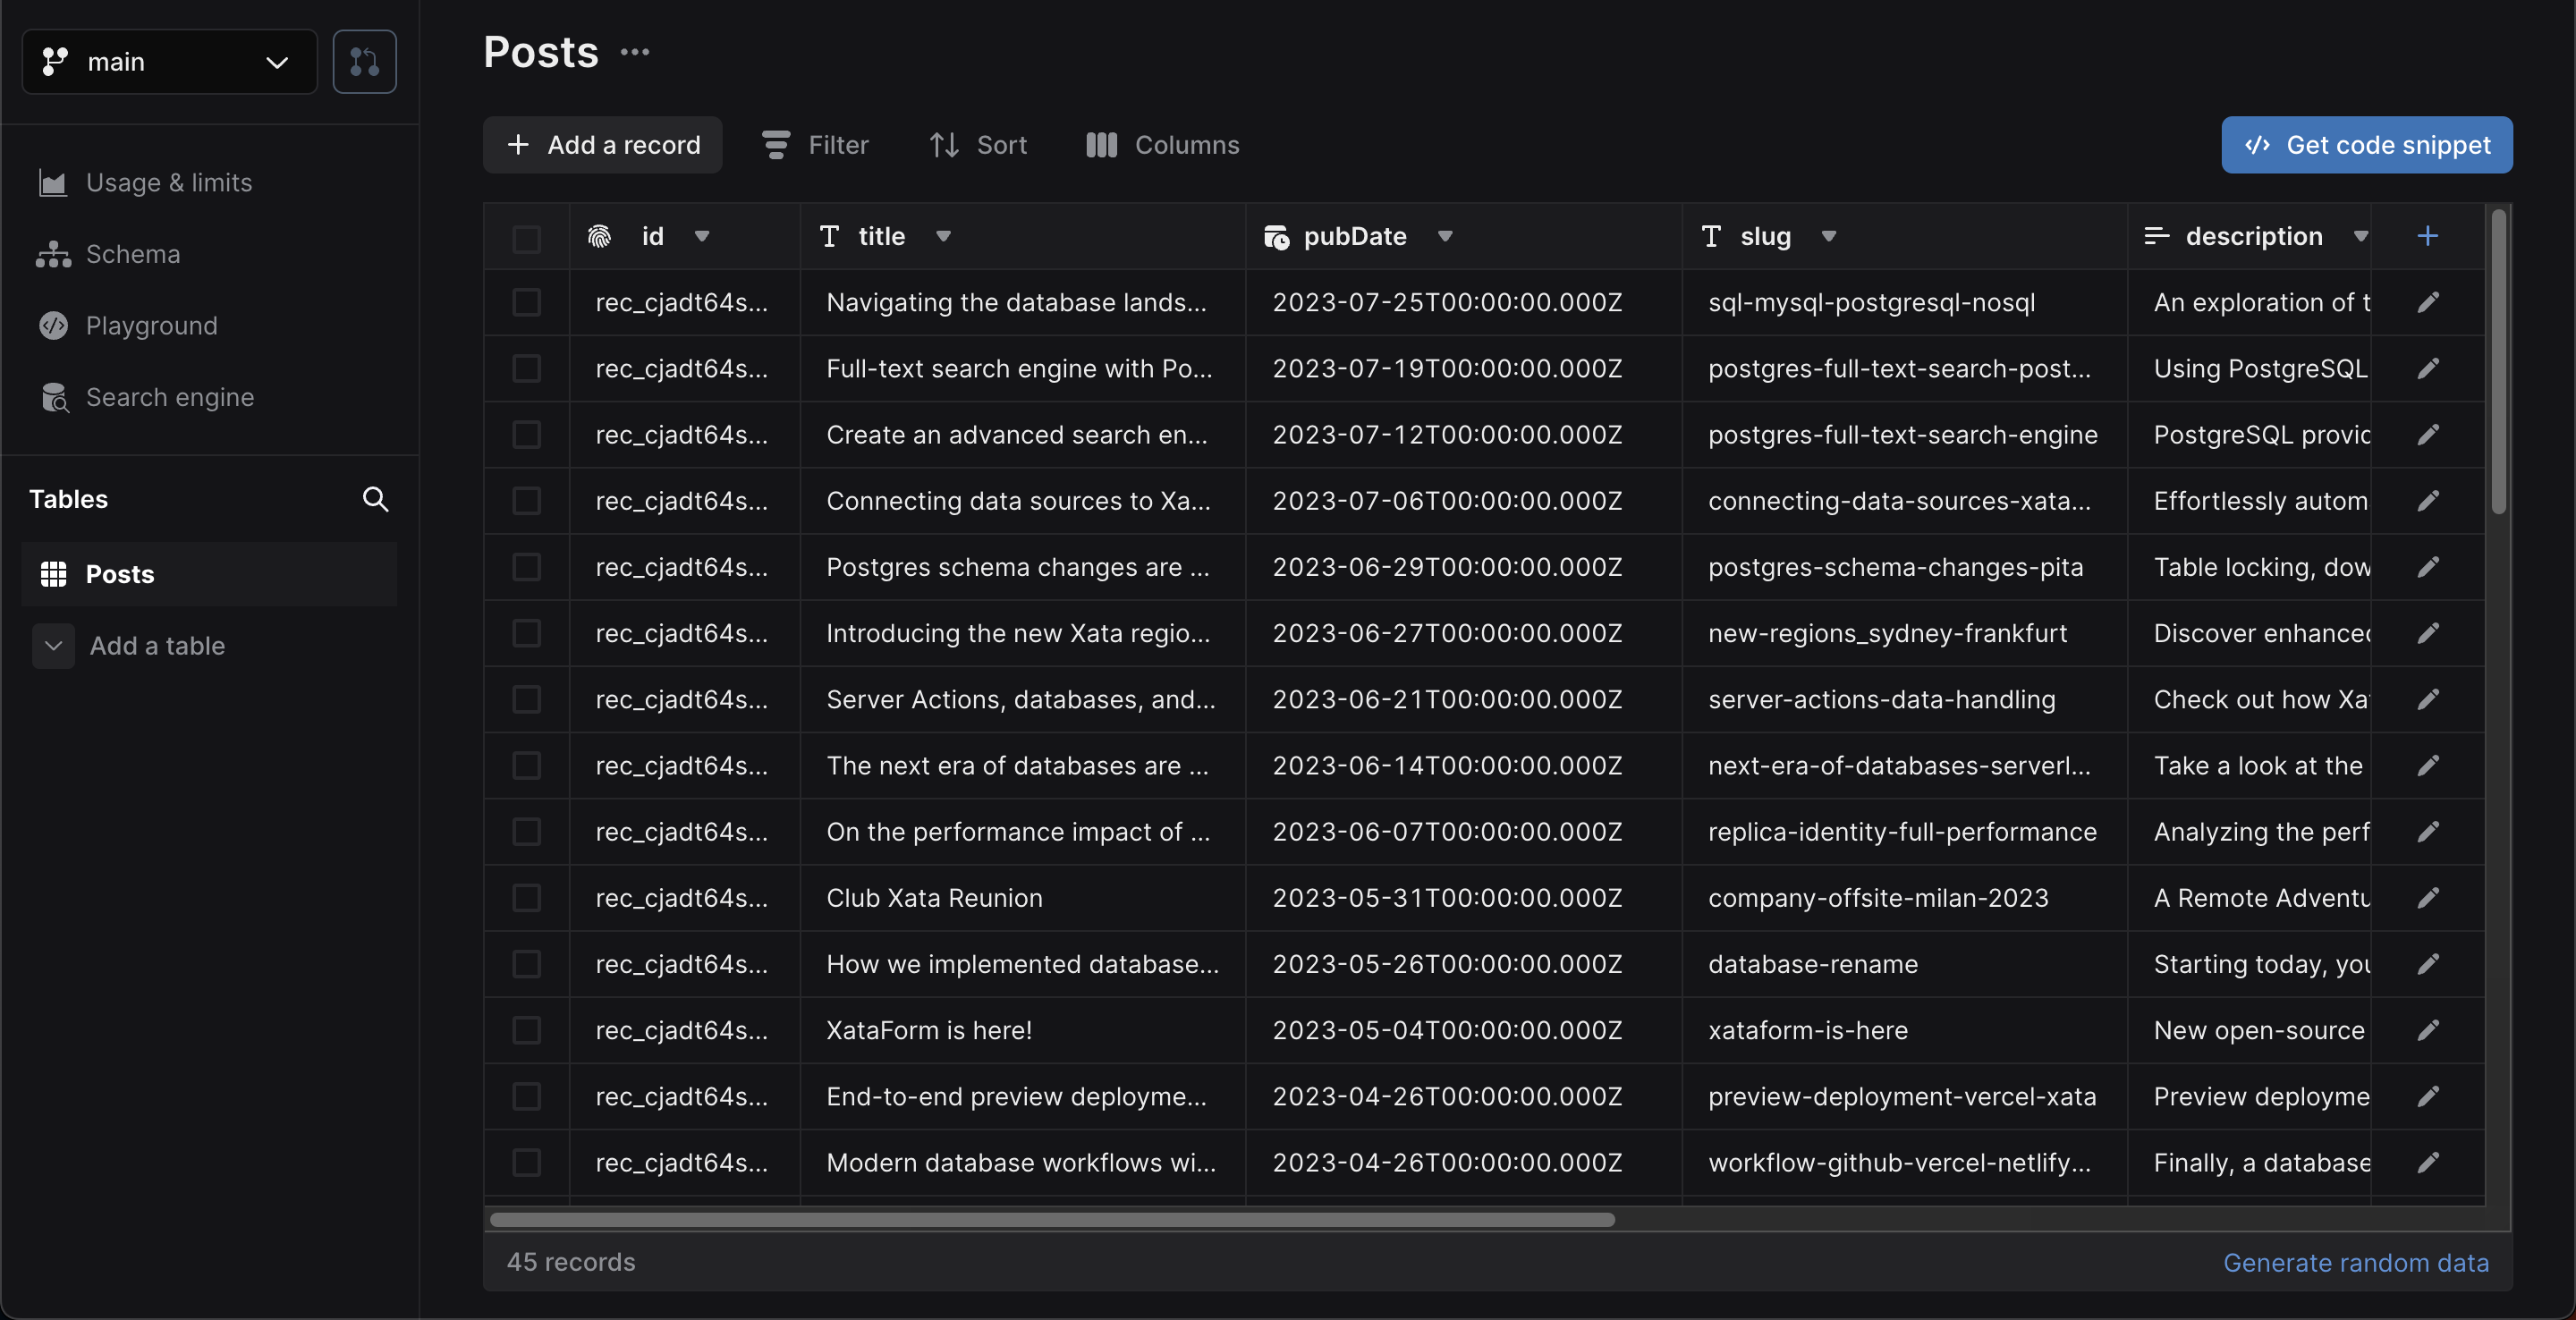
Click Schema to see the schema definition with the inferred data types:
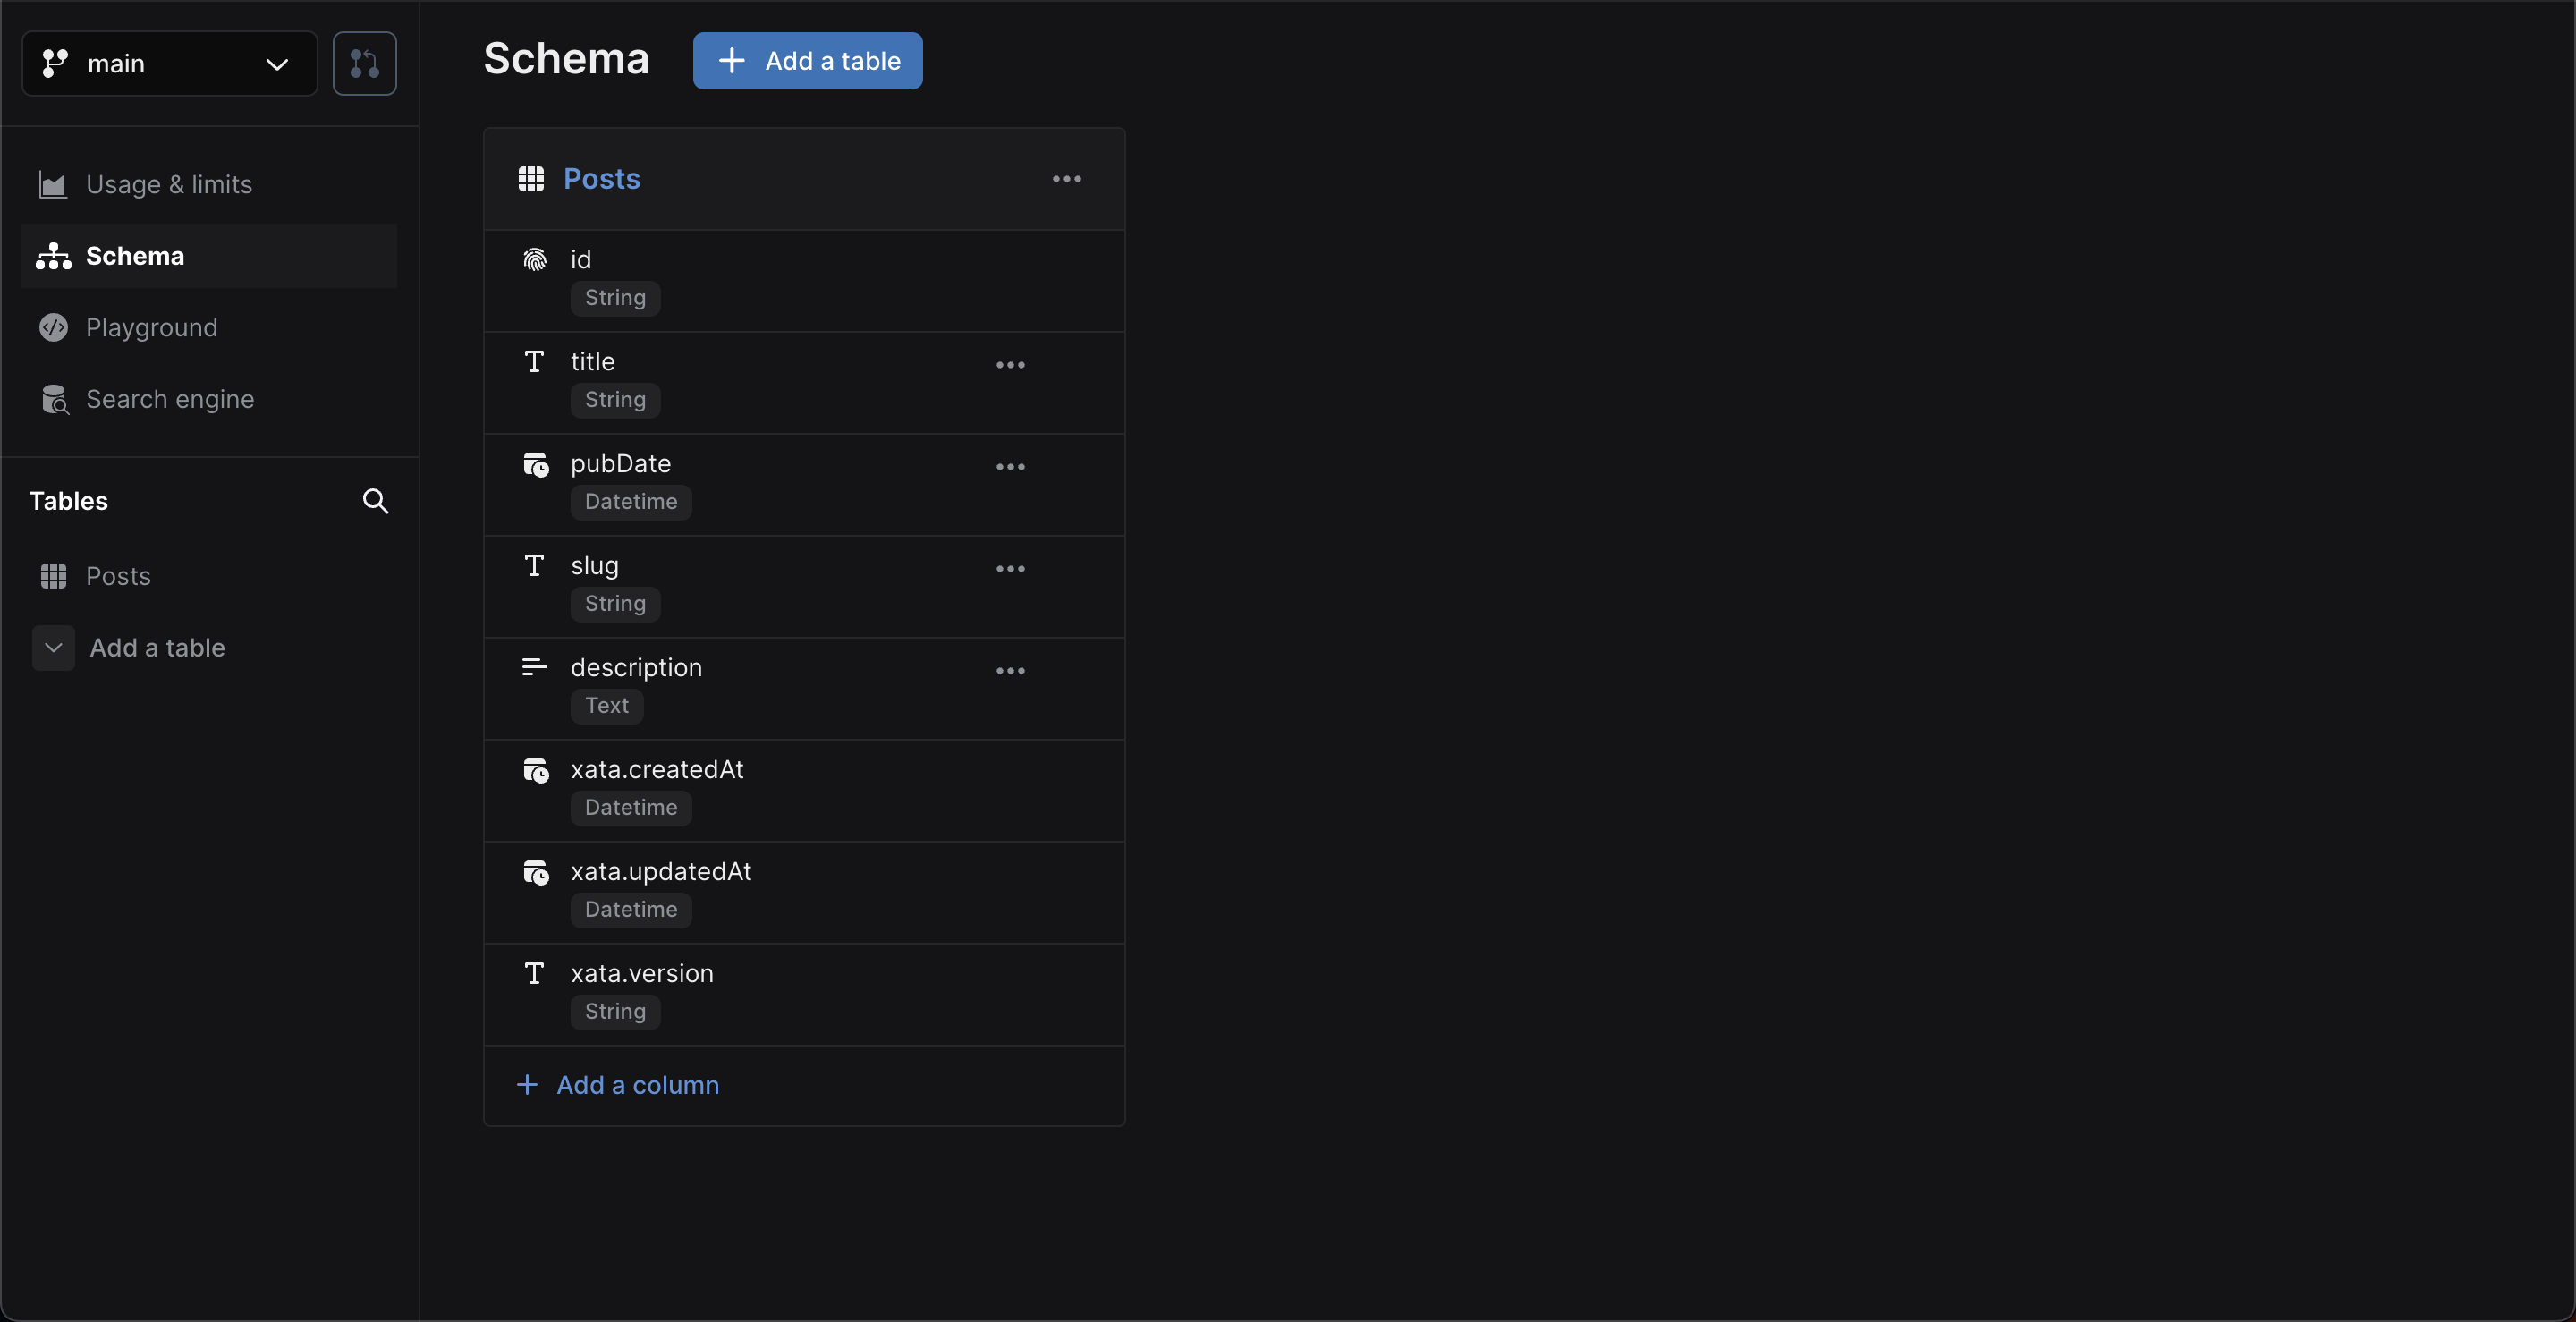
You'll also see xata.* special columns automatically
created and maintained by Xata.
With the database schema in place, the final step is to generate the code that allows you to access and query the data from our SvelteKit application. To do this, run:
xata pull mainThis updates the contents of src/xata.ts based on the schema defined on the main branch of your database. So, if you
make any further changes to the schema, run xata pull <branch> to update the auto-generated code.
Add the following global styling to the scaffolded src/app.postcss:
@tailwind base;
@tailwind components;
@tailwind utilities;

:root {
  --foreground-rgb: 0, 0, 0;
  --background-start-rgb: 214, 219, 220;
  --background-end-rgb: 255, 255, 255;
}

@media (prefers-color-scheme: dark) {
  :root {
    --foreground-rgb: 255, 255, 255;
    --background-start-rgb: 0, 0, 0;
    --background-end-rgb: 0, 0, 0;
  }
}

body {
  color: rgb(var(--foreground-rgb));
  background: linear-gradient(to bottom, transparent, rgb(var(--background-end-rgb))) rgb(var(--background-start-rgb));
}
Finally, update src/routes/+layout.svelte to add some shared structure across application pages. The code will end up as follows:
<script>
  import '../app.postcss';
</script>
<svelte:head>
    <title>Get started with Xata and SvelteKit</title>
</svelte:head>

<main class="flex flex-col items-center p-8 lg:p-24 min-h-screen">
  <div class="z-10 h-50 w-full max-w-5xl items-center justify-between text-xl lg:flex">
    <p class="fixed left-0 top-0 flex w-full justify-center pb-6 pt-8 lg:static lg:w-auto bg-gradient-to-b from-white via-white via-65% dark:from-black dark:via-black lg:bg-none">
      <a href="/" data-sveltekit-reload>Get started with Xata and SvelteKit</a>
    </p>
    <div class="fixed bottom-0 left-0 flex w-full items-end justify-center bg-gradient-to-t from-white via-white dark:from-black dark:via-black lg:static lg:h-auto lg:w-auto lg:bg-none">
      <a href="https://xata.io" class="w-20">
        <img alt="Xata logo" src="https://raw.githubusercontent.com/xataio/examples/main/docs/app_logo.svg" />
      </a>
    </div>
  </div>

  <slot />

</main>
Ensure the <slot /> component is before the closing </main> element.
The SvelteKit app is now ready for the Xata integration into the codebase.
Start by making use of
SvelteKit's loading data mechanism to retrieve all the blog posts from Xata
and make them available within the landing page. Create src/routes/+page.server.ts with the following contents:
import type { PageServerLoad } from './$types';

import { XataClient } from '../xata';

const xata = new XataClient({
  apiKey: import.meta.env.VITE_XATA_API_KEY,
  branch: import.meta.env.VITE_XATA_BRANCH
});

export const load: PageServerLoad = async () => {
  const posts = await xata.db.Posts.getAll();

  return {
    posts
  };
};
Begin by importing the PageServerLoad type definition from the SvelteKit generated $types module.
Then, import XataClient from the auto-generated src/xata.ts and create a new instance, passing in
the updated environment variables, VITE_XATA_API_KEY and VITE_XATA_BRANCH.
Define and export a load function. Within this function, use the xata client instance to get all the posts stored in the database.
Achieve this via the auto-generated Posts property, which exposes a number of helper functions. In this case, use the
getAll function to get
all the Post records. Finally, return the posts as part of the load function return value.
getAll() returns all the records in the query results. This is dangerous on large tables (more than 10,000 records),
as it will potentially load a lot of data into memory and create a lot of requests to the server. In most situations,
you should use getMany() or getPaginated(). See the querying
documentation for more information.
Next, update the landing page to load the data and render the list of blog posts:
<script lang="ts">
import type { PageData } from './$types';
export let data: PageData;
</script>
<div class="w-full max-w-5xl mt-16">
{#if data.posts.length === 0}
<p>No blog posts found</p>
{/if}
{#each data.posts as post}
<div class="mb-16">
<p class="text-xs mb-2 text-purple-950 dark:text-purple-200">
{post.pubDate?.toDateString()}
</p>
<h2 class="text-2xl mb-2">
<a href={`posts/${post.slug}`}>{post.title}</a>
</h2>
<p class="text-purple-950 dark:text-purple-200 mb-5">
{post.description}
</p>
<a
href={`posts/${post.slug}`}
class="px-4 py-2 font-semibold text-sm bg-purple-700 text-white rounded-lg shadow-sm w-fit"
>
Read more →
</a>
</div>
{/each}
</div>Here's a walkthrough of the code above.
First, import the PageData type. Then, define a data variable of type PageData. The value of this
variable is automatically assigned by the framework.
Next, update the logic within the UI. If no records are present, show a message saying, "No blog posts found". Otherwise, loop through the
data.posts using Svelte's each logic block and access the columns of
each Post record using their properties: pubDate to show the date the blog post was published, slug to link to individual
blog posts (which will be used use later), title for the title of the post, and description for the textual description of
the post.
This results in the page looking like the following:
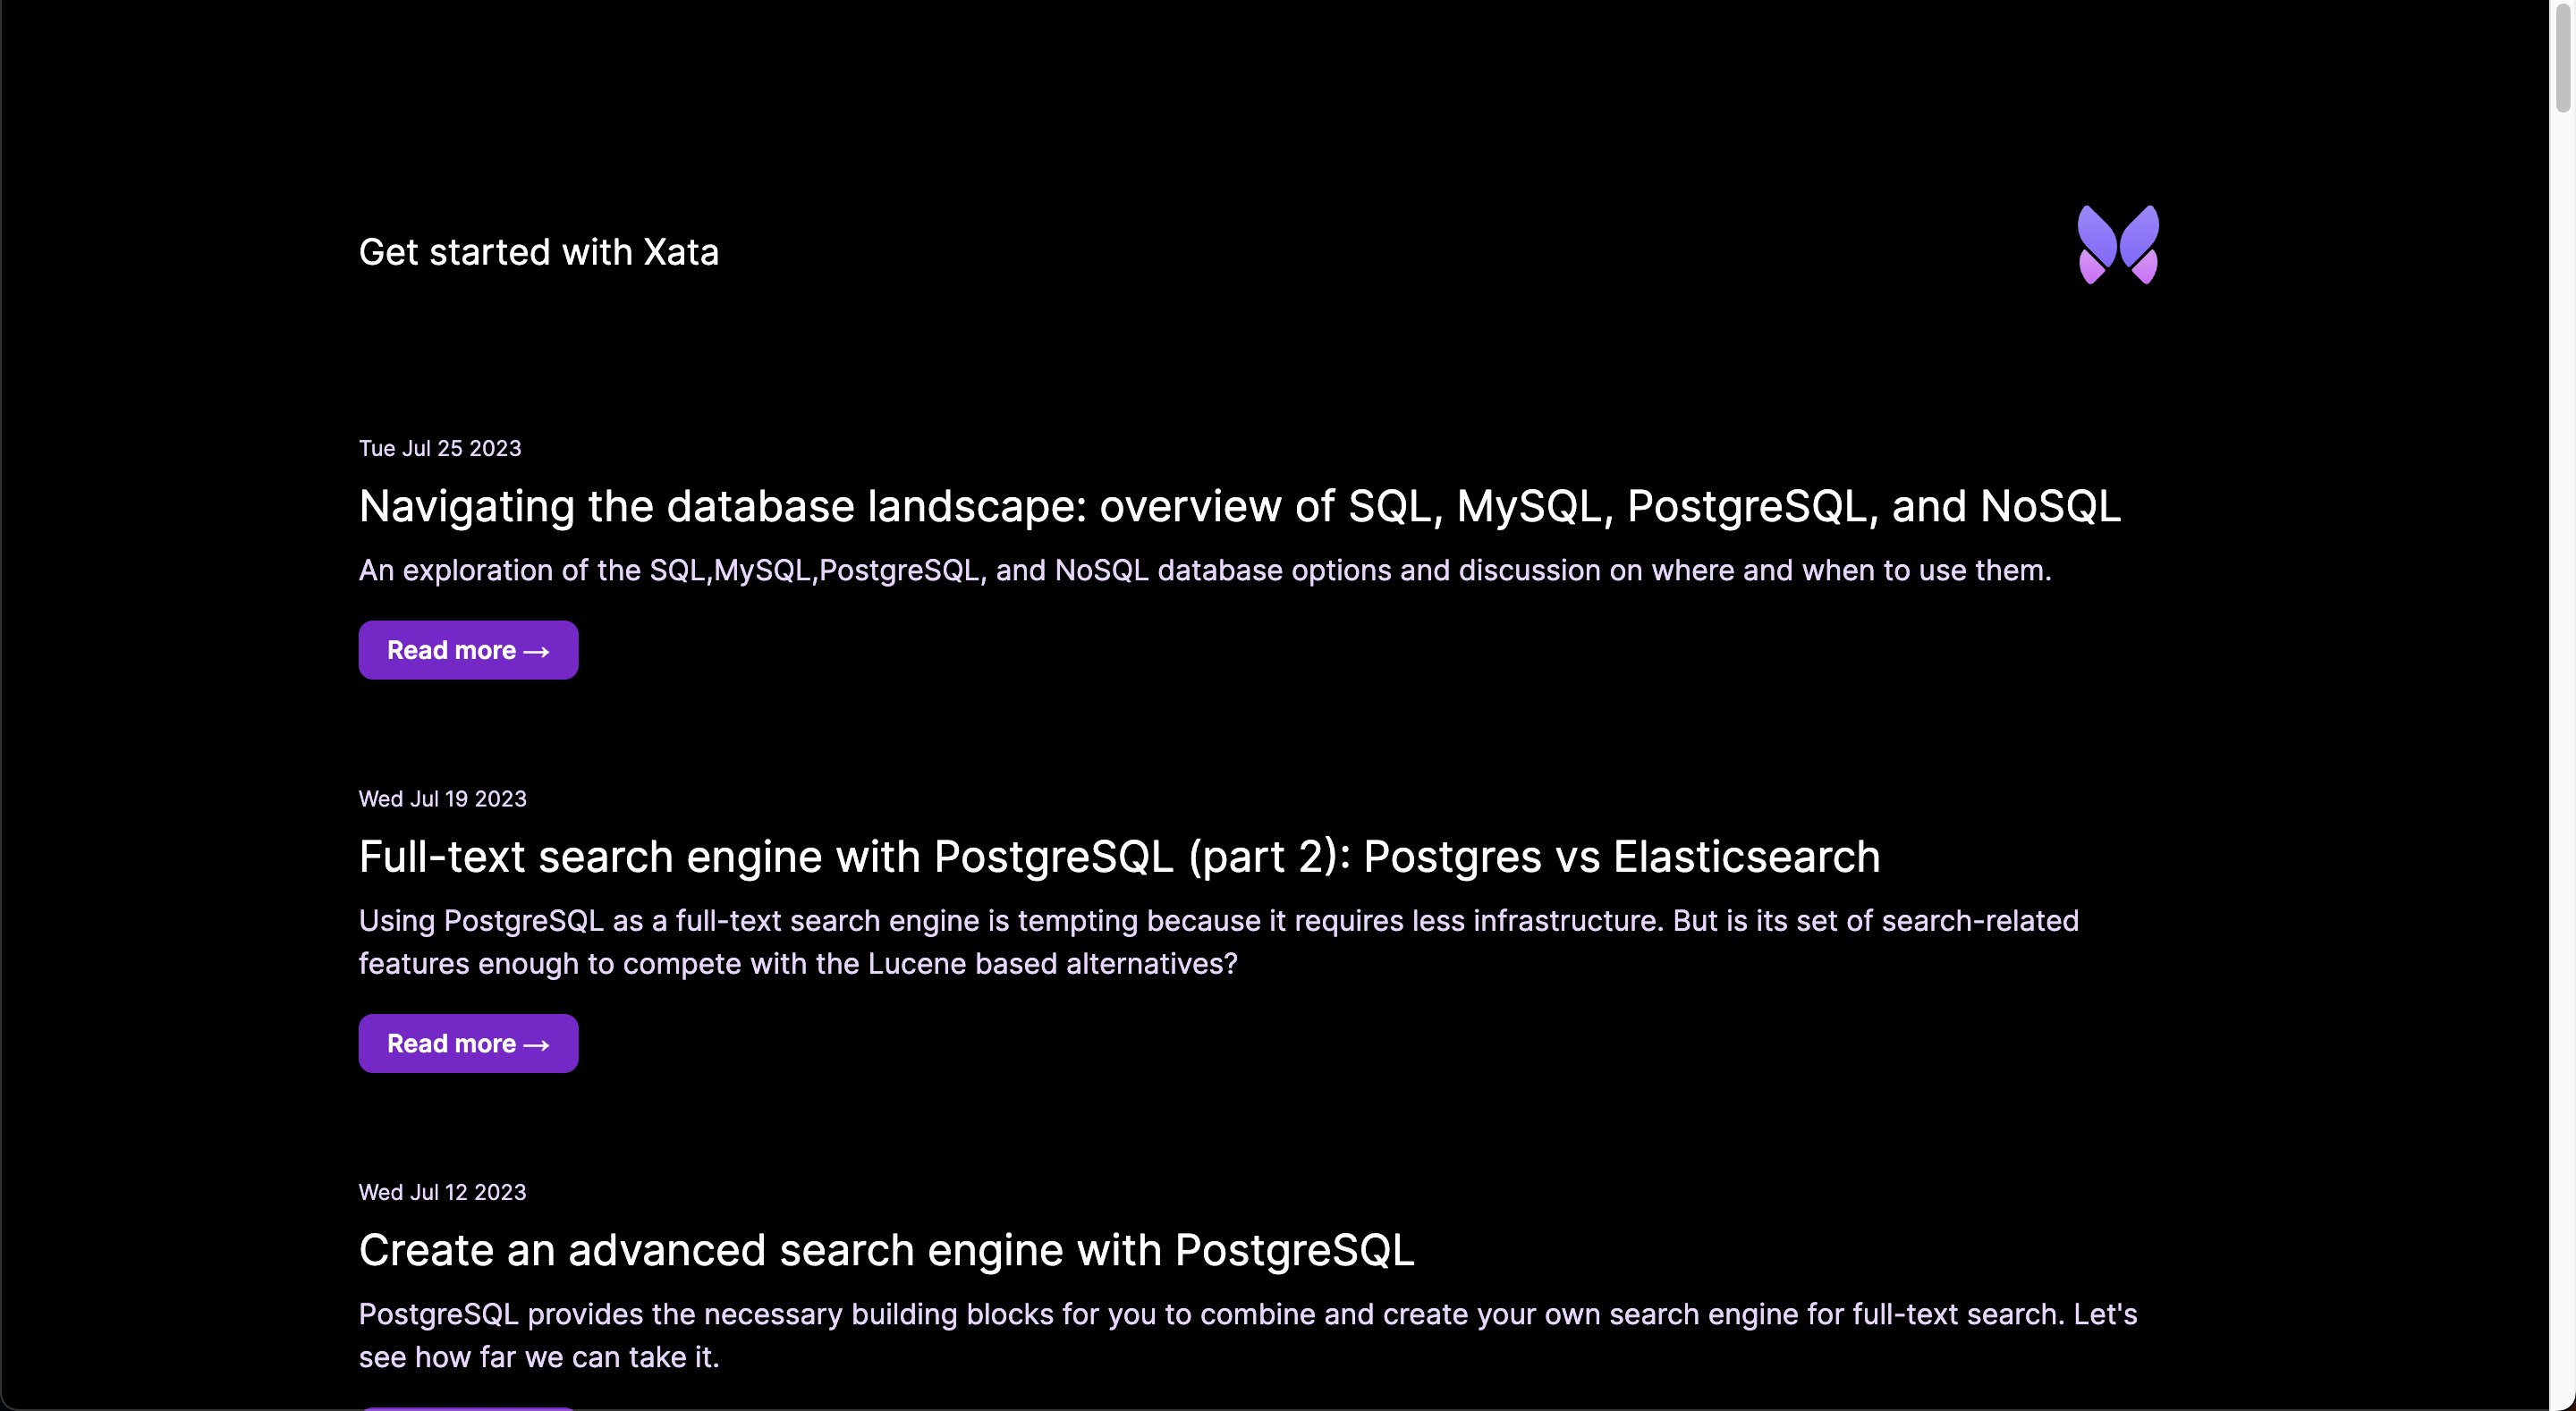
You'll notice that the post heading and "Read more →" text use the slug property to link to a page that doesn't
presently exist. That's the next step in this guide.
To handle the single posts identified by a slug, make use of SvelteKit page
parameters that are defined and passed based on file and directory naming conventions for SvelteKit pages.
Create new files, src/routes/posts/[slug]/+page.server.ts and src/routes/posts/[slug]/+page.svelte,
where the SvelteKit framework uses the directory [slug] to capture the name of the slug.
As with the landing page, use +page.server.ts to load data on the server. In this case, use the slug value to retrieve the
details for the single blog post:
import type { PageServerLoad } from './$types';

import { XataClient } from '../../../xata';

const xata = new XataClient({
  apiKey: import.meta.env.VITE_XATA_API_KEY,
  branch: import.meta.env.VITE_XATA_BRANCH
});

export const load: PageServerLoad = async ({ params }) => {
  const post = await xata.db.Posts.filter({ slug: params.slug }).getFirst();

  return {
    post
  };
};
Create a new instance of the XataClient client, and then use the
filter function on the
auto-generated Posts property to perform a query on the Posts table and find the
record where the slug column equals the value of params.slug. Use the
getFirst function to access
the first (and only) Post result and return the post as a property on the return value.
Next, update the contents of src/routes/posts/[slug]/+page.svelte as follows to render the Post data within the UI:
<script lang="ts">
import type { PageData } from './$types';
export let data: PageData;
</script>
<svelte:head>
<title>{data.post?.title}</title>
</svelte:head>
<div class="w-full max-w-5xl mt-16">
<p class="mb-2">
<a href="/" class="text-purple-600">
← Back to blog
</a>
</p>
<h1 class="text-3xl mb-2">
{data.post?.title}
</h1>
<p class="text-sm mb-4 text-purple-950 dark:text-purple-200">
{data.post?.pubDate?.toDateString()}
</p>
<p class="text-xl">
{data.post?.description}
</p>
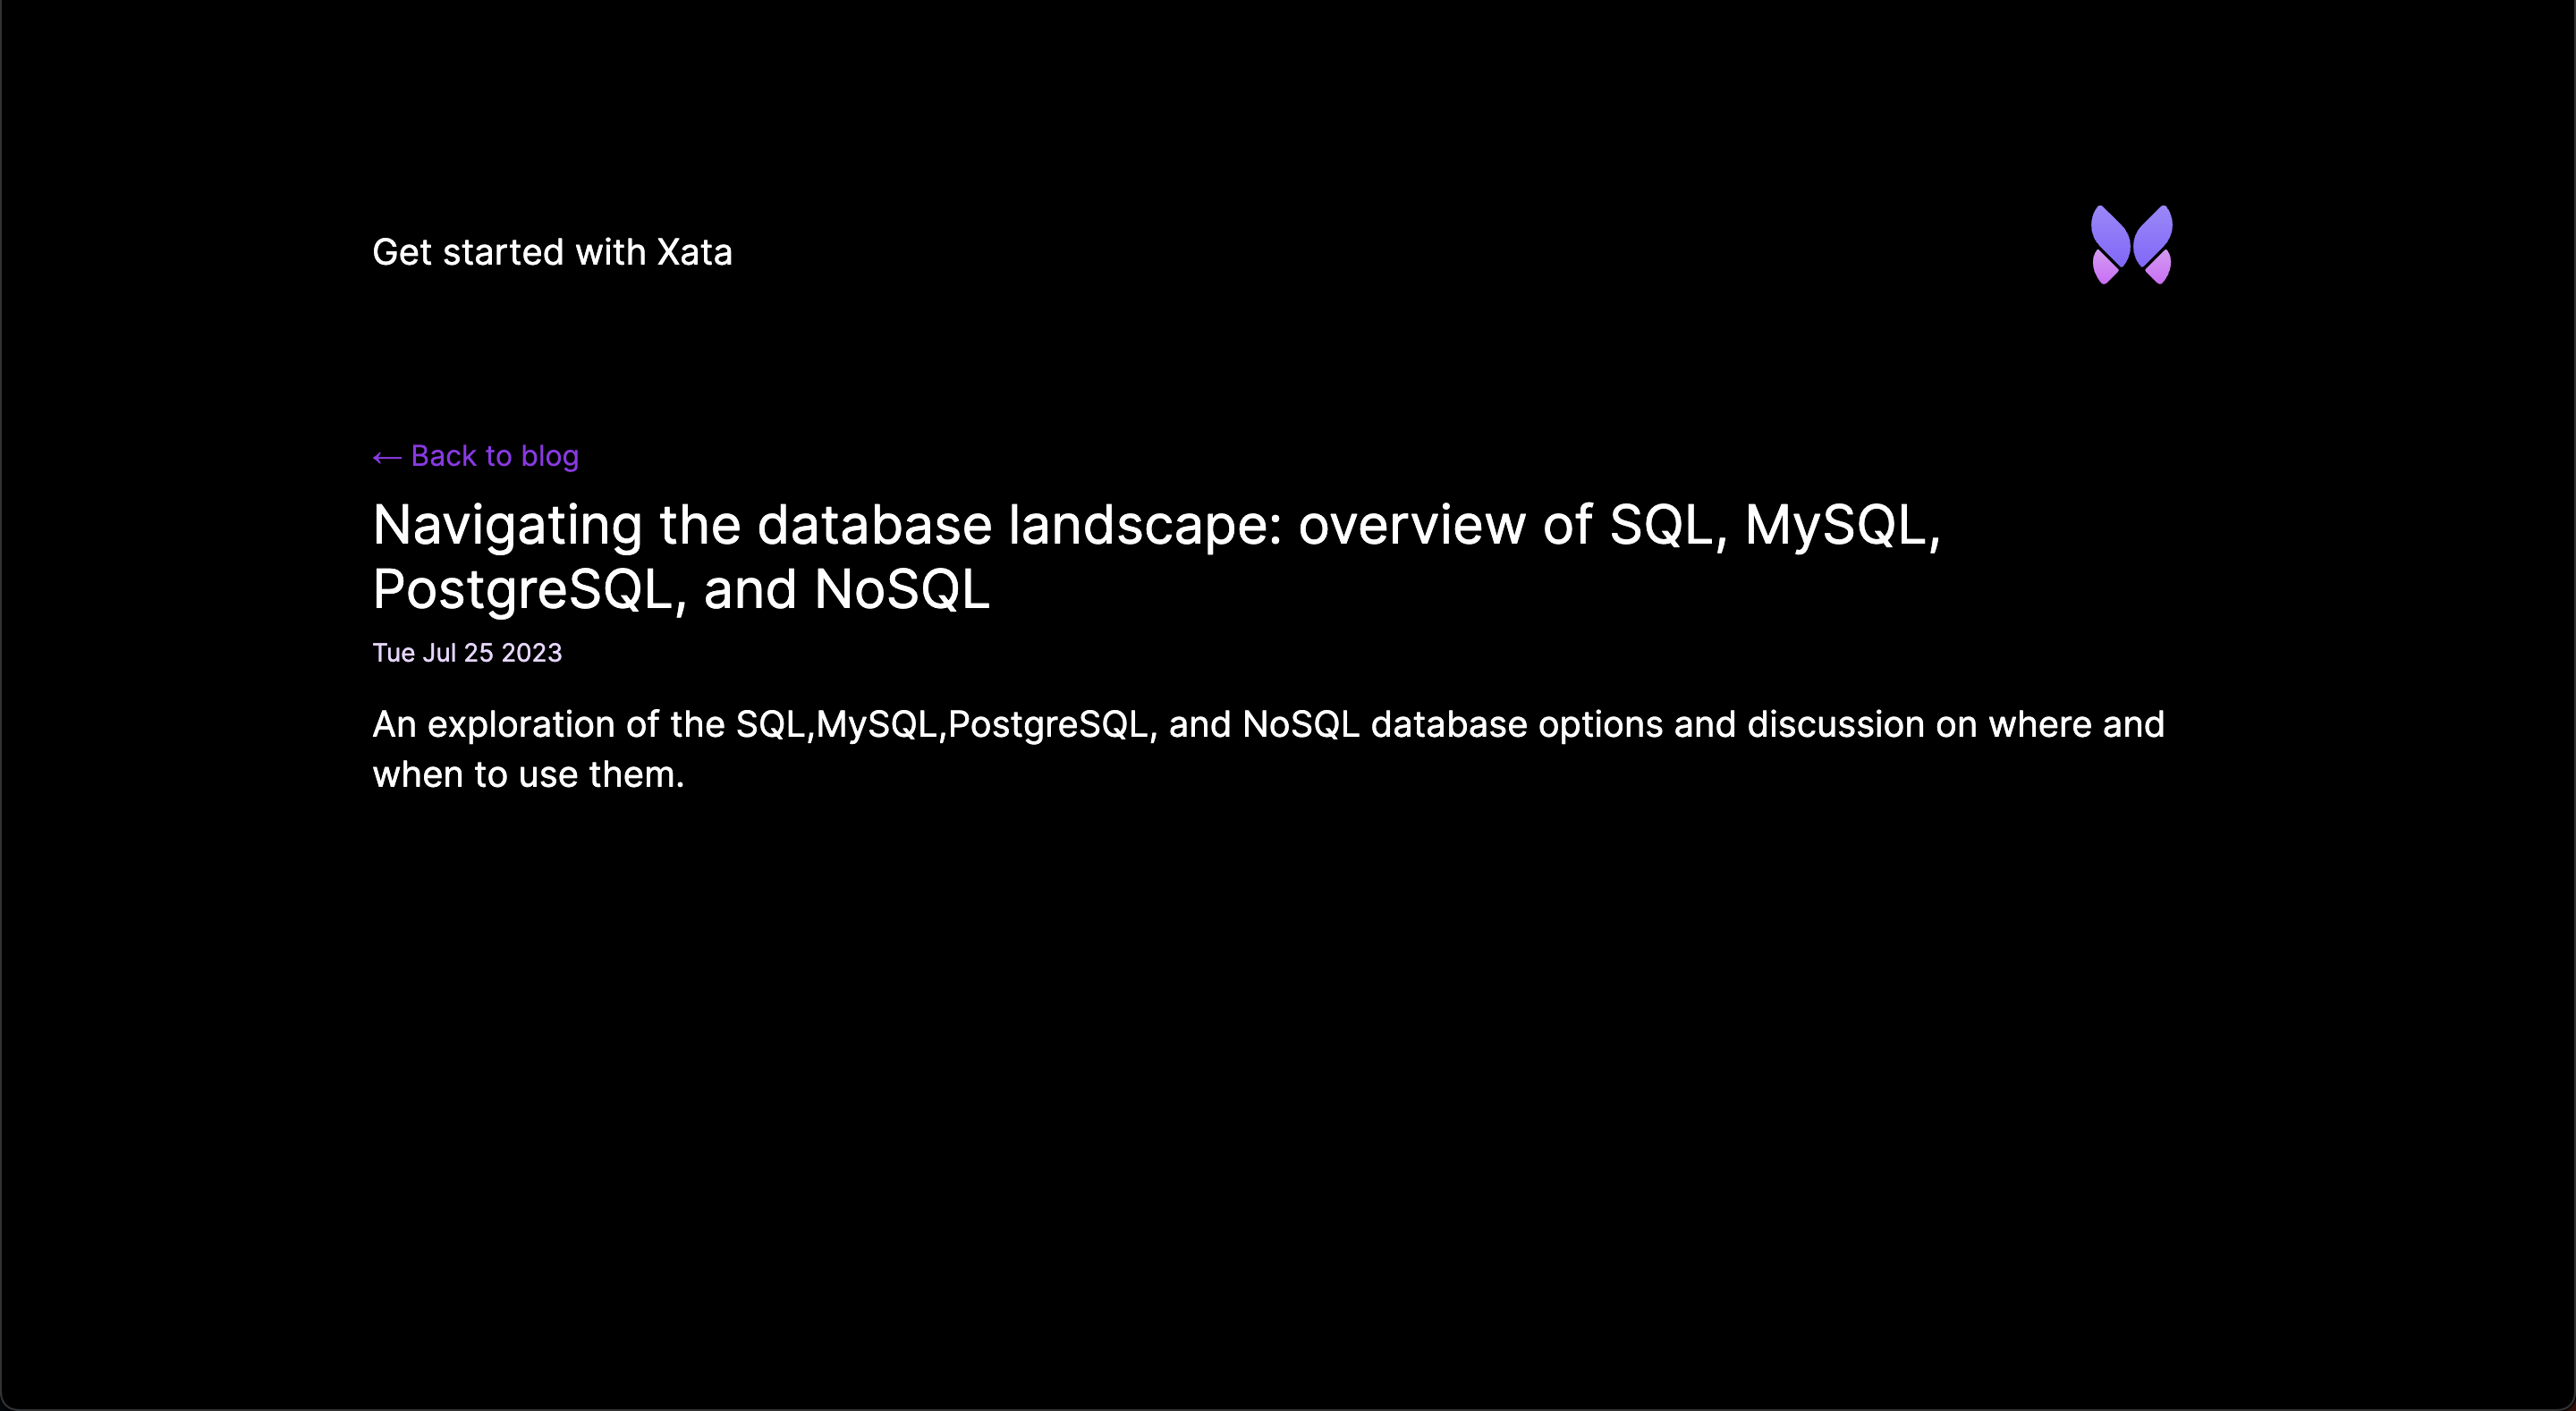
</div>In this page, first import the PageData type and the data value is automatically assigned by the framework. Then, use the value of
data.post?.title to set the page title using the <svelte:head> element. Finally, the UI is updated to show the
title, pubDate, and description.
The single blog post page will look as follows:
The last piece of functionality to add to the application is full-text fuzzy search of blog posts.
When you insert data into a Xata database, it is automatically indexed for full-text search. So you don't need to change any configuration to enable search, just need to use the TypeScript SDK search feature.
Add this functionality to the landing page server functionality:
import type { PageServerLoad } from './$types';

import { XataClient } from '../xata';

const xata = new XataClient({
  apiKey: import.meta.env.VITE_XATA_API_KEY,
  branch: import.meta.env.VITE_XATA_BRANCH
});

export const load: PageServerLoad = async ({ request }) => {
  const url = new URL(request.url);
  const search = url.searchParams.get('q');

  let posts = null;
  if (search) {
    const { records } = await xata.db.Posts.search(search, { fuzziness: 2 });
    posts = records;
  } else {
    posts = await xata.db.Posts.getAll();
  }

  return {
    posts,
    search
  };
};
Update the load function to take an argument and deconstruct the request property from that argument.
Create a new URL instance and get the q query string from the URL using url.searchParams.get('q'), assigning
the result to a variable named search.
The landing page should list all blog posts if search is an empty string. However, if
the search has a non-empty string value, a search is performed on the Posts table using the
search function exposed on the
auto-generated Posts property. Pass search as the text value to search for, and use a
second options parameter with fuzziness set to 2, which informs the fuzzy search behavior to allow for two
letters changed/added/removed. See
fuzziness and typo tolerance for more
details.
Update the load return value to include search in addition to the posts result.
The last change enables the user to input and submit a search. Add a <form> to the page to allow a search value
to be entered and submitted:
<script lang="ts">
import type { PageData } from './$types';
export let data: PageData;
</script>
<div class="w-full max-w-5xl mt-16">
<form data-sveltekit-reload>
<input
name="q"
placeholder="Search..."
value={data.search}
class="w-full rounded-lg border-2 p-2 dark:text-purple-950"
/>
</form>
</div>
<div class="w-full max-w-5xl mt-16">
{#if data.posts.length === 0}
<p>No blog posts found</p>
{/if}
{#each data.posts as post}
<div class="mb-16">
<p class="text-xs mb-2 text-purple-950 dark:text-purple-200">{post.pubDate?.toDateString()}</p>
<h2 class="text-2xl mb-2">
<a href={`posts/${post.slug}`}>{post.title}</a>
</h2>
<p class="text-purple-950 dark:text-purple-200 mb-5">{post.description}</p>
<a
href={`posts/${post.slug}`}
class="px-4 py-2 font-semibold text-sm bg-purple-700 text-white rounded-lg shadow-sm w-fit"
>
Read more →
</a>
</div>
{/each}
</div>The data.search value is used as the default value of the <input name="q" /> field to inform the user of the current
search.
The default behavior of a form is to submit a GET request to the current URL with any form inputs added to the query
string in the format {url}/?{input-name}={input-value}. For our search form, the result of a form submission is
a GET request in the format?q={q-value}. To allow this default browser behavior to take place, add the
data-sveltekit-reload attribute to the <form /> element.
With the browser default behavior set and the check for the q querystring search value already implemented, everything is in place.

The application now supports listing posts, viewing single posts via a slug page parameter, and full-text fuzzy search of
posts.
In this guide, you've learned that SvelteKit applications and Xata are a powerful combination. You created an application from scratch that lists blog posts, supports viewing a single blog post, and performs full-text fuzzy search on all posts.
You walked through setting up the Xata CLI and using it to:
- Create a new Xata project
- Create a database schema and populate it with data from an imported CSV file
- Update the auto-generated code (in
src/xata.ts) usingxata pull mainto reflect the updated schema
You then updated the landing page to list all blog posts, making use of the auto-generated xata.db.Posts.getAll
function. You also added the single post page making use of SvelteKit page parameters where a slug was passed and used
with xata.db.Posts.filter({ slug: params.slug }).getFirst().
Finally, you added full-text fuzzy search functionality to the landing page, leveraging Xata's automatic table
indexing. The search used a q query string and the auto-generated xata.db.Posts.search function.
If you enjoyed this guide, you could continue working on improving the application. Here are some suggestions:
- Add pagination for the blog post listing
- Add pagination for blog post search results
- Handle single post view page not finding a result for a
slug - Add a
bodyfield to the database schema to contain the full text of the blog post and update the single page view to use that new field
You can explore some of the features covered in more detail:
Or dive into some of Xata's more advanced features, such as: